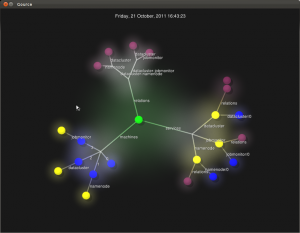
Juju ODS Demo - The Home Version
A few weeks ago I gave a live demo during Canonical CEO Jane Silber's keynote at the Essex OpenStack Conference, which was held in Boston October 4-7 (See my previous post for details of the conference and summit). The demo was meant to showcase our new favorite cloud technology at Canonical, juju. In order to do this, we deployed hadoop on top of our private OpenStack cloud (also deployed earlier in the week via juju and Ubuntu Orchestra) and fed it a "real" workload (a big giant chunk of data to sort) in less than 5 minutes.
I've had a few requests to explain how it works, so, here is a step by step on how to repeat said demo.
First, you need to setup juju to be able to talk to your cloud. The simplest way to do this is to sign up for an AWS account on Amazon, and get EC2 credentials (a secret key and a key ID is needed).
If you install juju in Ubuntu 11.10, or from the daily build PPA in any other release, you'll get a skeleton environments.yaml just by running 'juju'.
Once this is done, edit ~/.juju/environments.yaml to add your access-key: and secret-key:. Optionally, you can set them in AWS_ACCESS_KEY_ID and AWS_SECRET_ACCESS_KEY in the environment.
Now, you need the "magic" bit that turns juju status changes into commands for the "gource" source code visualization tool. Its available here:
http://bazaar.launchpad.net/~clint-fewbar/juju/gource-output/view/head:/misc/status2gource.py
(wgettable here)
http://bazaar.launchpad.net/~clint-fewbar/juju/gource-output/download/head:/status2gource.py-20110908235607-pfnddi4d114nl8qd-1/status2gource.py
You'll also need to install the 'gource' visualization tool. I only tried this on Ubuntu 11.10, but it is available on other releases as well.
Make sure your desired target environment is either the only one in .juju/environments.yaml, or set to be the default with 'default: xxxx' at the root of the file. You need 'juju status' to return something meaningful (after bootstrap) for status2gource.py to work.
Now, in its own terminal, run this, note that cof_orange_hex.png is part of the official Ubuntu logo packs, but I forget where I got that. You may omit that commandline argument if you like, and a generic "person" image will be used.
python -u status2gource.py | gource --highlight-dirs \

--file-idle-time 1000000 \

--log-format custom \

--default-user-image cof_orange_hex.png \

--user-friction 0.5 \

-
This will not show anything until juju bootstrap is done and 'juju status' shows the machine 0 running. If you already have services deployed, it should build the tree rapidly.
So next if you haven't done it already
juju bootstrap
Once your instance starts up, you should see a gource window pop up and the first two bits, the bootstrap node and the machine 0 node, will be added.
Once this is done, you can just deploy/add-relation/etc. to your heart's content.
To setup a local repo of charms, we did this:
mkdir charms

bzr init-repo charms/oneiric

cd charms/oneiric

bzr branch lp:~mark-mims/+junk/charm-hadoop-master hadoop-master

bzr branch lp:~mark-mims/+junk/charm-hadoop-slave hadoop-slave

bzr branch lp:~mark-mims/+junk/charm-ganglia ganglia
Those particular charms were specifically made for the demo, but most of the changes have been folded back in to the main "charm collection", so you can probabl change lp:~mark-mims/+junk/charm- to lp:charm/.
You will also need a file in your current directory called 'config.yaml' with this content:
namenode: job_size: 100000 job_maps: 10 job_reduces: 10 job_data_dir: in_one job_output_dir: out_one These numbers heavily control how the job runs with 1 or 100 hadoop instances. If you want to spend a couple of bucks in Amazon, and fire up 20 nodes, then raise job_maps to 100 and job_reduces to 100. Also job_size to 10000000. Otherwise its over very fast!
We started the demo after bootstrap was already done, so the next step is to deploy Hadoop/HDFS and ganglia to keep an eye on the nodes as they came up.
juju deploy --repository . --config config.yaml hadoop-master namenode

juju deploy --repository . hadoop-slave datacluster

juju deploy --repository . ganglia jobmonitor

juju add-relation namenode datacluster

juju add-relation datacluster jobmonitor

juju expose jobmonitor
This should get you a tree in gource showing all of the machines, services, and relations that are setup.
You can scale out hadoop next with this command. Here I only create 4, but it could be 100.. depending on how fast you need your data map/reduced.
for i in 1 2 3 4 ; do juju add-unit datacluster ; done
Finally, to start the teragen/terasort:
juju ssh namenode/0
$ sudo su -u hdfs sh /usr/lib/hadoop/terasort.sh
You may also want to note the hostname of the machine assigned to the jobmonitor node so you can bring it up in a browser. You will be able to see it in 'juju status'.
Its worth noting that we had a fail rate of about 1 in 20 tries while practicing the demo because of this bug:
https://bugs.launchpad.net/juju/+bug/872378
This causes the "juju expose jobmonitor" to fail, which means you may not be able to reach the ganglia instance. You can fix this by stopping/starting the provisioning agent on the bootstrap node. That is easier said than done, but can be scripted. Its fixed in juju's trunk, so if you are using the daily build, not the distro version, you shouldn't see that issue.
So once you're done, you'll probably want to get rid of all these nodes you've created. Juju has a tool that strips everything down that it has brought up, which can be dangerous if you have data on the nodes, so be careful!
juju destroy-environment
It does not have a '--force' or '-y', by design. Make sure to keep the gource running when you do this. Say 'y', and then enjoy the show at the end. :)
I'd be interested to hear from anybody who is brave enough to try this how their experience is!


